I don't celebrate Halloween, but took part in a Halloween card swap this year. I used a tattered lace die to make the pop up box out of blue card from Lidl. I used largest of the Marianne owl dies and more Lidl card to make my witchy owl. I die cut his hat from the accessories for Tim Holtz Crazy Birds die and added purple glitter glue to it. Using black archival ink I stamped that bat from the Hunkydory For the love of stamps Halloween set on the box, using my fingertip as the acrylic block as its a tiny stamp. I die cut several of the impression obsession branch and snipped it in places before adding them to the supports in the box. I'd bought an unbranded set of ghost dies from eBay and so I cut these in white card and added them on acetate popping out of the box. I also added them to the sides of the box. Apologies for the dodgy photos but I was in a rush to get the card in the post. In fact I was in a rush making the card and fortunately it turned out to be a quick make! In my haste though, I forgot that it was supposed to be a secret swap and signed the back of the box...
Tuesday, 31 October 2017
Friday, 27 October 2017
Sweet Stampin' - Bears

The clocks go back tonight, so I get an extra hour in bed. Yippee! Alternatively, I could get up early and use the extra hour to craft. Nope, you're right. Not a chance in heck of that happening!
Back to today and we have a new challenge over at Sweet Stampin' and we want to see BEARS this week. I had to be careful how I worded that or we could get some really interesting entries!
I made a super simple card this week using the Waffle Flower, Bear and Bird Stamp set. I used my MISTI to stamp my composition in black archival ink and coloured it in with my zigs. I then added a few highlights with a white pen. To assemble the card I simply added a mat of grey card on a 5x7 card base. Simples!
I'm looking forward to seeing your creations, just remember to include some stamping to be eligible for our top three. Hope you all have a wonderful weekend and if you're in the UK don't forget to put the clocks back tonight x
Tuesday, 24 October 2017
Indigoblu Retreat - Day One

I spent the weekend in Retford at the Indigoblu Secret Retreat. I had a brilliantl time, lots of hugs, laughter and crafting. Kay is lovely and gives amazing hugs and she was helped out by Lou (who demos ecoline on Hochanda) who is mad as a hatter! Alex who is a presenter on Hochanda was also on the retreat, complete with a candy skull apron. What you see on screen is exactly what you see in real life, she's great, but we won't mention how she spilt an entire bottle of paint in her lap...
You can see the project we made on the first day above. We used a stencil to ensure that we all had a reasonably shaped face with all the features in the right place and then Kay took us through the painting step by step.
Of course I had to do a little shopping whilst I was there, especially when they were generous enough to give us a 20% discount. They allowed us to rummage through the unpackaged stencils to find the ones we wanted and Alfie gave a demonstration of how they make the stamps whilst making some that were out of stock for people. Hubby very kindly gave me birthday money early and so I spent the lot!
I bought a load of paints (the top eight are the ones we used to paint the face (not including the hair and background) and some slap it on which we mixed with the paints to extend their working time and make more of a glaze.
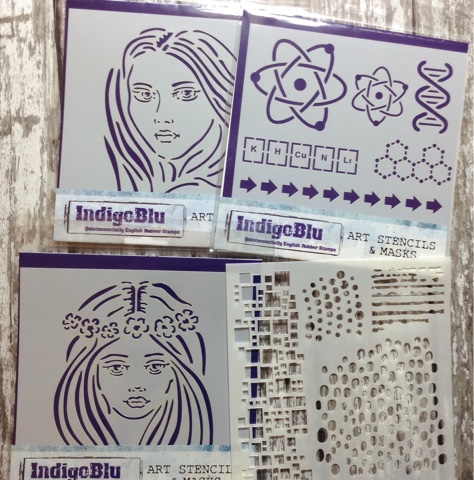
Of course I had to buy some stencils, including the one I used on my project.
I was very good and didn't buy many stamps as I have waaaay to many. Occasionally when they make the stamps part of the rubber doesn't come out perfect and so they trimmed off those parts and allowed us to buy the undamaged parts at bargain prices.
Finally, I bought some of their yummy luscious pigments which you can mix with various mediums to make paints and glazes and colour texture paste etc. I also bought some fabric slap it on as I have some Pink Ink printed designs that I plan to use the pigments on.
Sunday, 15 October 2017
The Flower Challenge - Reminder - Your Favourite Flower

It's time for our halfway reminder post over at The Flower Challenge and we're celebrating our first birthday with some amazing prizes. Please read our special challenge rules ie include our theme cue card and tell us which prize you would like. We've had a few entries that we've had to disqualify for not following the rules, which really upsets us.
We've asked you to use your favourite flower this month and so I've continued with tree blossoms. I started off with a 6x6 card base. I die cut two consecutive sized Tattered Lace Pin Dot Squares in white card to add some dimension. I then used the Spellbinders Cherry Blossom die set which I've had in my stash for years, so it was good to use it again. I die cut the branches a couple of times and arranged them in the card, snipping them to fit at times. I then cut the smaller flowers multiple times and glued them in place. Once finished I added stickles to the centre of each flower. Originally the main branch ran diagonally from left to right on the card, but when I picked it up to stick it on the card after the stickles had dried, it was the other way round. I decided I preferred it that way! I die cut the Memory Box Hello three times and layered it up to give more dimension before adding it to the card. I'm claiming that this is another card that looks better in real life, you can see the white colour more clearly and it doesn't look like it has a brown outline to the branches!
Saturday, 14 October 2017
Sweet Stampin' - Sparkle and Shine

I can't believe that it's Saturday again, but that means it's time for our next challenge over at Sweet Stampin' and this week we want to see you "Sparkle and Shine" which is the exact opposite of how my house looks at the moment!
I used Heartfelt Creations Tattered Blossoms which I stamped with black Stazon on Hunkdory mirridazzle card. I have the dies to match these stamps, but the plastic coating on the card makes it tricky to die cut, so I decided to settle down on the sofa and fussy cut them instead. I used Heartfelt Delicate Asters for the leaves and treated them in the same way but on silver mirri card this time.
I stamped the sentiment from Visible Image on a piece of card just under 6 inches square with black archival ink and mat and layered it with some more mirridazzle. I glued two of each sized flower together, offsetting the petals as I did so and added them to the card. I added a clear gem to the centre of each flower. Finally, I added a doodled corners with a fine liner pen.
This card was a swine to photograph with all the sparkle and shine, so I hope yours is easier! Just remember to include some stamping to be eligible for our top three x
I used Heartfelt Creations Tattered Blossoms which I stamped with black Stazon on Hunkdory mirridazzle card. I have the dies to match these stamps, but the plastic coating on the card makes it tricky to die cut, so I decided to settle down on the sofa and fussy cut them instead. I used Heartfelt Delicate Asters for the leaves and treated them in the same way but on silver mirri card this time.
I stamped the sentiment from Visible Image on a piece of card just under 6 inches square with black archival ink and mat and layered it with some more mirridazzle. I glued two of each sized flower together, offsetting the petals as I did so and added them to the card. I added a clear gem to the centre of each flower. Finally, I added a doodled corners with a fine liner pen.
This card was a swine to photograph with all the sparkle and shine, so I hope yours is easier! Just remember to include some stamping to be eligible for our top three x
Thursday, 12 October 2017
Bucilla Nordic Gingerbread House Advent Calendar

I finally finished the Bucilla kit that I started back in January. I lost the will to live when I started making the 25 individual pieces that are attached the the house on a small piece of cord made from embroidery thread. These are designed to be added to the scene each day and hang from the red sequins dotted around the design. After an eight month break I was ready to attack them again! The hanging is about 24 inches high.
Technically it's not finished, as I still need to sew on the hanging cord on the back, but I'll sort that out when I'm ready to hang it. I've finished another much smaller kit since this one and am currently making different wall hanging. This one also has individual elements that you're supposed to hang on it, but I'm just sewing them in place this time!
Wednesday, 11 October 2017
Snowy Again

I have to confess that not much card making is going on at the moment as I've got back into making my Bucilia felt decorations again and sewing whilst watching telly stops me putting food in my mouth! I'll show you some pics of the finished projects if we actually get some daylight to take them in. Got a couple of design team cards to rustle up this week though so that might inspire the crafting mojo.
I made this card a while ago using a watercoloured image of Snowy by Penny Black. I trimmed a card down to fit the leftover panel of a distress oxide ink background and glued it in place. I added some corners using a Polkadoodles die. I edged the panel with some faux stitching and then added some stickles to finish. The 'snow' stickles look less obvious in reality, more like the ones down the sides by Snowy. Simples!
Subscribe to:
Posts (Atom)