Monday 29 January 2018

Rudolph Days Challenge

I've not joined in the Rudolph Days Challenge for absolutely ages, but in my attempt to be *slightly* more organised this year, it's a great way to make some Christmas cards throughout the year.
I had the Sara Davies Signature range Cosy Penguin die lurking in the NBUS mountain and so thought it was time I had a play with him. He was really simple to die cut and assemble, but I didn't bother to emboss the detail in his hat and scarf. I was going to add googly eyes to him, but of course couldn't find them in my crafting chaos. Obviously, they'll turn up tonight now...
I decided to make four cards to boost my total. I found one sheet of 8x8 paper that I think was a magazine freebie and my rudimentary maths told me to cut it into 2 inch wide strips to go on my four 6x6 cards, hence the design was born!
I added a mat of silver mirri and then a layer of white card on top. I did think about die cutting a diver frame and just using that straight onto the card base, but decided that was far too much effort! I glued everything in place and them used my MISTI to stamp the Papermania sentiment in black archival. I added some stickles to his pom pom and a few gems to finish off. Simples.

Friday 26 January 2018

For the Love of Stamps - Fur You & A Grand Adventure

Thank goodness it's the weekend. Two days to relax and ignore all those jobs that need doing!
This card was originally going to be for the Less is More challenge, but it got a bit too busy in the end. I used two Hunkydory stamps sets from their "For the love of stamps" range, Fur You and A Grand Adventure. I masked and stamped the images in archival black to build up the scene and drew in a hill to stand the trees on. The misti is so handy for doing this as you don't always get a perfectly stamped image near the mask and it allowed me to repeat stamp to minimise this. I coloured in the image using my zigs. As I was colouring directly onto a card blank I didn't want to add too much ink to it and so used my polychromos pencils to finish colouring. I added the Clearly Besotted sentiment to finish.
I hope you all have a relaxing weekend x

Whipper Snapper Bunny Huddle, Less is More - OLC Cute

Over at Less is More their current challenge is the much loved one layer card with a cute theme.
I found this cute Whipper Snapper, Bunny Huddle stamp in my NBUS pile, so it was a great excuse to finally ink it up. I also used a LOTV Handwritten Sentiment stamp and stamped them in black archival ink. I simply coloured them in with my polychromos pencils, I think I'm finally starting to get the hang of them!

Wednesday 24 January 2018

A Grand Adventure

The curse of silver mirri card strikes again! Apologies for the wonky photo, I swear the sentiment is straight(er) in real life.
I had some reject card fronts from making my zodiac card the other day - you know the type, the ones where the mask slipped or the ink spritzer went everywhere. I decided to chop them up and die cut a circle out of the galaxy part, mount it on some silver mirri card and use it on another card. I thought the astronaut stamp from Lili of the Valley would work perfectly with it. I stamped it in black archival ink and coloured with my zigs, before cutting it out. I added it to my card with foam tape, then had a rootle about for a suitable sentiment. I thought this one from a NBUS Hunkydory stamp set, A Grand Adventure worked with the image and so added it to my 6x6 card blank. Simples!

Monday 22 January 2018

Impression Obsession Good Wishes

Pfft, Monday again and a dark and gloomy one at that - thought I'd get the excuses for the bad photo in early!
I whipped up a super quick and easy card today, in fact I made two of them. I used Impression Obsession's Good Wishes Word Block die and cut it in blue card. I had some left over pre-coloured, glittered and cut Lawn Fawn Fairy Friends images lurking in a plastic bag that I came across yesterday. I thought that they would work perfectly with this die and so added one, complete with magic wand of course, onto the 6x4 card with foam tape. Simples! 
I hope you all have a good week and of course I'm sending lots of good wishes to you all x

Saturday 20 January 2018

Sweet Stampin' - Men's Cards

Yay, it's the weekend! I hope you're all cosy and not being bothered too much by the wintery weather. As it's Saturday, it's time for our new challenge over at Sweet Stampin' and this week we want to see cards for men.
I used the dylusion's Diamond in the rough stencil that I bought recently on my 5x7 card base and blended Distress Oxides in Twisted Citron, Cracked Pistachio and Broken China through it and then spritzed on a little water and let it dry.
I stamped one of the monsters from the new Polkadoodles Little Monsters Funky stamp set in black archival ink and coloured him in with my zigs before fussy cutting him.
I drew in a border around my stencilling - I kind of wish that I'd done the bottom border a bit lower to cover more of the stencilling but hey ho. I glued my monster in place and then rummaged about for a suitable sentiment. I'd recently bought a craft magazine which came with some freebie stamps and I thought their "Hello Handsome" sentiment was perfect as I think this would make a great Valentine's card!
I can't wait to see what you create for the challenge, just remember that you need to include some stamping, which includes digi stamps to be eligible for our top three. Stay warm and keep crafting x

Thursday 18 January 2018

Altenew Christmas Rose

I hope you're all safe and well and not too badly affected by the wintery weather. We've been lucky here, just a few gusts and some sleet and hailstorms. Apologies for the rubbish photo, the light has been dreadful. It is a white card blank really!
So, continuing with my layered stamp theme, I found this Altenew Christmas Rose set lurking, unused in my stash. It was a freebie with a magazine a whole ago, just don't ask me when or which magazine!
I used Altenew's purple ink set for the flowers and two shades of green momento ink for the leaves (again don't ask me which ones!) and black archival for the line art. 
The set does come with matching dies, but once again I was in the mood to sit and fussy cut whilst watching TV. I arranged the flowers in a rough circle on a 6x6 card sticking them in down with foam tape, this allowed me to tuck the leaves in behind them and glue them in place.
I die cut the Lawn Fawn Scripty Happy die three times out of purple card and layered them up to give some strength before gluing them in place. To finish I added some stickles to the centre of the flowers. 

Monday 15 January 2018

Altenew Beautiful Day - Take Two!

Thank you for all your kind thoughts about my gammy neck. I'm pleased to report that whilst still painful, it is settling down and seems to be a much quicker recovery compared to the last time I had it done in September fortunately.
I threatened you with a second card made from my leftover bits from the Altenew Beautiful Day set and so here it is! I used a 6x6 card blank and the sentiment banner is years old, I think from the days when Lakeland had a craft catalogue. Very simples!
Gratuitous bunny photos coming up. Willow has been quite subdued since Parsley passed away, but is starting to return to her cheeky self now. She's having a precautionary course of medication and will then be spayed and then we can look for a new friend for her. She's very good and will eat her medication if I squirt it onto a fenugreek crunchie for her as you can see in the picture below,. She's also sporting some interesting moult lines!
Actually getting a photo of Willow is very tricky as she doesn't sit still, so I just end up with a lot of blurred grey photos. I did manage to get a couple of shots as she tried to escape from the run though. She still loves a good fuss and has the softest fur of any bunny I've owned. She now weighs 1.3kg and so is always going to be a smaller bunny but with a big personality.

Sunday 14 January 2018

The Flower Challenge - Spotlight Stamping Reminder

We're halfway through the month and so it's time for our reminder post at The Flower Challenge where this month we want to see "Spotlight Stamping".
My amazing teamies have been creating lots more inspiration for you, but if you're still stuck, this month's Cardmaking & Papercraft magazine has a feature on Spotlight Stamping!
I'm afraid I cobbled together a card at the last minute, despite my best intentions to have it done in plenty of time. I had another round of facet joint injections and radio frequency nerve lesioning on my cervical spine on Friday causing acute pain and reduced range of movement in my neck for a few days until it settles down and takes effect fully. Not the most conducive to crafting but hey, I was determined to make something.
I stamped the Impression Obsession Daisy Basket stamp on a 6x6 scalloped card blank in black archival ink. I spotlighted some of the flowers in yellow and gold using my Zig Clean Colour pens. I felt that the yellows looked too harsh against the uncoloured rest of the stamp and so I naughtily added some grey to the rest of the stamp. I hope that it still counts as spotlighting though. Perhaps just do as I say and not as I do with your entries though! 
To finish I added a sentiment from a Lili of the valley handwritten sentiments stamp set and added some faux stitching around the edge of my card. Simples! You've got until 24th January to get your entries in and I can't wait to see what you come up with. I hope you all have a great week x

Saturday 13 January 2018

Altenew Beautiful Day

Mum asked me to make a birthday card for one of her friends earlier in the week and as I wasn't in the mood for colouring, I decided to use the Altenew Beautiful Day stamp set. I couldn't be bothered to work out an arrangement of flowers and mask them off, so I decided to stamp all the elements individually and then fussy cut and arrange them.
I used three of the Dreamees' Dinky Inkies to stamp the flower and black archival ink for the outlines. I used two shades of green momento ink to stamp the leaves. A bit miffed as despite thinking that I was being careful I managed to tear off part of the base leaves stamp when removing it from the acetate. Fortunately, it stuck back together on the acrylic block well and the next layer of green hid any tear marks on the leaf. I also stamped the "twiddly bits" of foliage in black archival and then used a waterbrush and the momento green and a dinky inkies to colour them in before fussy cutting everything. 
I stamped my sentiment from the Clearly Besotted Magnolia Blooms set on a 5x7 card blank and then arranged my flowers around it, snipping the leaves and twiddly bits to fit. I mounted the flowers on 1mm deep foam tape so that I could tuck the leaves etc in behind them and glued everything else into place.
I ended up with lots of left over bits and so have "take two" to show you later in the week. 

Wednesday 10 January 2018

Sack the photographer! - LIM "Purples"

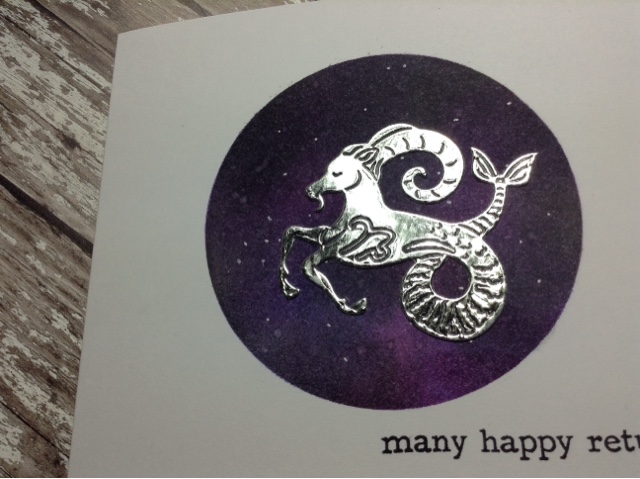
Why is silver mirri card the most impossible thing to photograph on the planet? Hey ho, just use your imagination, it's probably better than my card anyway. Let's see if I can manage to keep on track at Less is More this week. I hope it's purple enough for them!
I decided to use the Tattered Lace Capricorn die which has been languishing unused in my stash (one star sign down eleven to go...) and cut it out of the dreaded silver mirri card. I wanted to create a space sky behind the sign and so I die cut a circle out of some Hotel Chocolate packaging as it was quite thick and had a waxy feel and so wouldn't soak up the ink. As I was blending straight onto the card and wasn't sure how well it would move the ink I added a base layer of Antique Linen Distress Ink first. Hels Sheriden who is a Ranger Educator taught me this technique which will help the inks to blend more easily on top of it, but isn't dark enough to discolour your work. I applied Shaded Lilac, Seedless Preserves and Wilted Violet Distress Inks with a mini blender tool to the circle to give a blended purple circle. I then blended on some Black Soot Distress Ink to create the galaxy look. I spritzed on some water and left to dry. Once dry I spritzed on some white spray ink from my stash and added some white dots with a white gel pen. I stamped the sentiment from Clearly Besotted's Happy Birthday stamp set and glued the Capricorn in place to finish. Honestly, it looks better and more vibrant in real life and the sentiment is straight(er)!

Tuesday 9 January 2018

Lack of mojo card making.

Sorry about the poor photo, it's barely got light here today. Not a huge amount of creativity went into this card I'm afraid, but hey, it's a card. I've spent a couple of hours this afternoon sorting out the crafting table of doom (aka the kitchen table) in the hope that having a space larger than 4"x4" to craft in will help my mojo. It still looks like an explosion in a craft shop though!
In the midst of all that I found the ingredients to make this card. I think the images were from an old issue of Making Cards magazine which I'd previously fussy cut out. I glued them in place on a 6x6 card base and drew in some ground and a border with a fineliner. I coloured in my border with a spectrum noir sparkle pen. I stamped the Paper Smooches sentiment in black ink and added some stickles to the llama's attire. Totally Simples!

Monday 8 January 2018

Recent Stash Acquisitions!

One of my not really a new year resolution, resolutions, was to blog more frequently, but the crafting mojo has gone AWOL and so I thought I'd share my new stash with you instead. Apologies for the rubbish photos, mostly due to the rubbish light and rubbish photographer! Hubby bought me the Bigz dies shown above as part of my Christmas present and he also bought me the dies shown in the following two pictures...

Okay, when I say he bought them for me, what actually happened was that Sizzix had a sale on and so I did some online shopping and then told Hubby that was what he was buying me! I did get good value though (well, I think so) as all the above, including the £6.94 delivery, came to a grand total of £41.87. Now, I'm not telling you this, but I've just had an email telling me that Sizzix have got some more sale offers on their website. I totally didn't tell you that and so cannot be held responsible for any spending that may take place.
As I mentioned yesterday I wandered into my favourite craft shop yesterday and they had lots of lovely yellow sale stickers dotted around the shop and a few big crates of goodies to rummage through. I was very restrained and put back a lot of the items that I originally picked up. I convinced myself that I probably have enough Christmas stash to last until 2098 and so focused on the more everyday stash. I think I definitely got some bargains and have smuggled them into the house and integrated them into my stash whilst Hubby is at work. Tee hee!

Sunday 7 January 2018

More Tags!

I know, you thought that you'd escaped any further Christmas themed items, but then I found these two spare tags. I had some left over reindeer from my ATCs that I made with Clearly Besotted's Let's Prance and they fitted perfectly on some small tags that I purchased from eBay a while ago. I applied some copper glitzcraft sparkle paste through a star stencil onto the tags and once dry added the reindeer on 1mm deep foam tape and doodled a border.
The larger tag was another pre-bought tag and this time I stenciled white sparkle paste through a falling snow stencil. I stamped the bunnies (which I think are from a now discontinued Apple Blossom set) in black momento ink and coloured it in using my trusty copics. I aimed to make their colours roughly the same as Willow and Parsley as I used these tags on the presents that were from them (the poo presents for hubby (which caused much hilarity) and presents to my parents for helping out with them). Again, I attached them with 1mm foam tape and drew in a border. I also added some nuvo glitter accents to ground them. Simples!
I was so focused on adding the right size and colour tag to the right parcel eg my brother in laws favourite colour is green so I used the snowmen with green scarves on for his presents, that I forgot to write on lots of the tags. Doh! Fortunately, they were all for family I was spending Christmas with and I was able to work out from the size, shape and of course choice of tag, who the recipient was.
I promise that's the last of my Christmas makes, but I may need to start on next years soon! I happened to be near my favourite craft shop today (unaccompanied) and they had pretty much all their Christmas items on sale, along with a quite a few other things. I was very restrained as after large vet bills, money is very tight, but I did pick up a few bargains. I'll show them to you later as I've left them hidden in the car boot so that Hubby doesn't know about them!

Saturday 6 January 2018

Sweet Stampin' - Winter White

Saturday already, at least I think it is, I still haven't got my head back into normal week mode yet. I managed to put the bins out a day later than they are usually collected, but a day earlier than they were actually being collected! At least I didn't miss collection day I suppose.
Having established that it's actually Saturday (although it's actually Friday evening as I type this scheduled post - have I confused you yet?), it's time for our next challenge at Sweet Stampin'
This week our theme is Winter White - so we want to see your predominantly white creations.
I started off by applying Cosmic Shimmer Sparkle paste through a SSS Falling star stencil to the front of a 6x6 card base and letting it dry. I stamped the sentiment, bear, jumper and presents from the freebie Hunkydory stamp set that came with Creative Stamping magazine recently. I fussy cut them all, apart from the sentiment which I cut out with a SSS Stitched Rectangle die. I coloured in his paws with a zig marker and the stars on his jumper with a signo silver sparkle pen. I added a white circular frame to my card cut from tattered lace pearl circles and essential circles dies. I assembled the card using 1mm foam tape and added some diamond stickles to the ribbons on the presents. To finish, I couldn't resist a little faux stitching around the edge of the card.
I can't wait to see your makes this week, just remember that you need to include some stamping to be eligible for our top three.

Thursday 4 January 2018

The Flower Challenge - Spotlight Stamping.

 It's time for our first challenge of the year at The Flower Challenge and this month our focus is "Spotlight Stamping" .
I started off with a 5x5 card blank and stamped the blossom stamp from Clearly Besotted's Beautiful Friend set in black archival ink. I started with a roughly central image and then filled in the space around it. I stamped the butterflies from Uniko on some scrap paper and cut them out to form a mask. I then drew round these in pencil to create my spotlight areas. I used my zig markers to lay down the basic colours and added in some more colour with my polychromos pencils within the butterflies. I had originally intended just to rub out the pencil outline of the butterflies and leave it as that, but it looked unfinished and so I drew round them with a fine liner pen.
I die cut Lawn Fawn's Scripty Happy in black card and glued it in place. To finish I added pink stickles to the centre of all the blossoms, whether they were within the spotlight areas or not.
I can't wait to see your creations this month, just remember that flowers need to be the focal point of your project. Don't forget to check out my teamies fabulous inspiration if your mojo needs a little help. Happy crafting x

Tuesday 2 January 2018

Hunkydory Mice and Less is More

Less is More have had a sketch challenge running for the last couple of weeks , before they launch  their new year of challenges this weekend. I have to confess that as soon as I saw the sketch, I thought, "Cheese!" Nothing to do with the Christmas Stilton obviously. When I think of cheese with holes, it takes me back to my childhood where I had an imaginary friend called "Squeaky Mouse". I know, I was an odd child. Squeaky Mouse was very naughty and would get up to all sorts of mischief, including eating holes in blocks of cheese. This inspired my card. I have to confess too, that I didn't look at the sketch again until after I'd made my card, so there are a few differences.
I started off by cutting a piece of yellow card to form the cheese and a matching piece of black card to sit under it. I used circle dies to remove the corners from the yellow card. I had intended on embossing some extra "holes" in the cheese by using dies with the embossing sandwich, but something went wrong and it cut them instead, so I decided to go with the flow! I stamped the sentiment from Hunkydory's Love of Stamps, Meadow Mice - Friends Like You set in black archival using my MISTI.
I then glued the black card on a card blank and added the cheese layer on top using 1mm deep foam tape. 
I already had the two mice left over from making another card, which of course, I forgot to photograph before posting it. Doh! The bottom mouse was from the Friends Like You set and the hanging mouse was from another Hunkydory stamp set - A Mice Day. Both mice were stamped in black archival and coloured using my Zigs and then fussy cut. I added them to the card with foam tape, tucking the tail inside the hole. Simples!