Thursday 31 March 2016

A bouquet by post, or less is not more in this case!


I'm back. I forgot to say in my earlier post how much I appreciated your good wishes with my return to work today, it certainly helped, so thank you all very very much. I'm not too tired after work and as Hubby is out playing darts tonight I thought I'd do a little crafting.
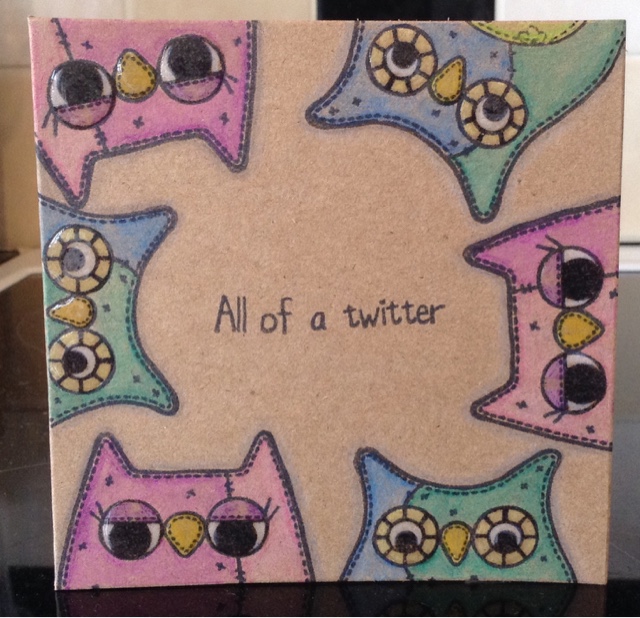
I wanted to send my friend the equivalent of a bouquet of flowers (cos I'm too cheap to send her proper ones!). I had the urge to go embellishment crazy and I think I achieved that. Apologies for the rubbish photo, the kitchen lights aren't the best for photography.
I started off with the super cute stamp from Stamping Bella, you know me, any excuse to buy something with bunnies on it, which I coloured with copics. I cut the image out using spellbinders label 25 and layered it up with majestic labels 25. I used papers from lili of the valley promises pad and distressed the edges. I then chucked on about 20% of all the paper flowers I have, pearls, crochet lace, organza, a dazzler from creative expressions and I think that's it. Oh and then added some stickles round the edges and with it on my finger tip added a little to the flowers. The little tags are from a lili of the valley tag set and I added a few gems to them. I think that's it, I stopped just short of adding the kitchen sink. Now I've got to make a box to post it in!
I'm going to share this card with the Stamping Bella blog

Santa Paws


Afternoon! I survived my first day back, I deleted 124 emails telling me my mailbox was nearly full. More to go tomorrow.
It's a beautiful sunny spring day here in Lancashire, so when better to share a Christmas card?
I used the stamp set from Simon says stamp and paper pieced it. I struggled to find suitable papers for the animals but then stumbled on a monochromatic set from Docrafts which has pairs of patterns reversed. I coloured them with my copics to give me the right colours and went round the edge of the animals with a pale blue to give them some definition. I die cut the image with tattered lace pin dot rectangle and embossed the 4x4 kraft card base with tonic pin dot squares. I added ranger black enamel accents for the eyes and noses and glossy accents covered with glitter (for the antlers) and polar white flowersoft (for the hat trim). I gave the scarf a sparkle with clear wink of Stella and edged everything with some stickles.

Wednesday 30 March 2016

What's on your workdesk Wednesday

Happy Wednesday everyone! Is it just me that's been thrown this week by the bank holiday? It doesn't feel like a Wednesday, but I couldn't tell you want day it does feel like.
Down to business, as it's Wednesday (apparently) it's nosey day where we join forces with the lovely Julia to see what everyone is up to in their creative spaces. Are you sat down?
Shock horror! There is bare table in evidence! Okay, in reality I just shoved everything backwards, but it looks good at a quick glance.
On my stamping mat are some patterned papers and a Simon says stamp Christmas stamp ready for some paper piecing. You may also notice my pen holders, one prettified with self adhesive fabric and crochet lace and the other in its naked coffee tin form.
Just to give you a heads up, if I go missing from blogland for a few days, it's because I go back to work tomorrow having been off ill for over 8 months. I'm very lucky in that I'm having a phased return and so am only doing two half days this week, but it'll probably wear me out to start with. Right, off to do some stamping whilst I can.

Tuesday 29 March 2016

Simon Says: Come Rain Or Shine


I'm joining in with the Wednesday challenge over at Simon Says Stamp which this week has the theme of come rain or shine.
I used the lili of the valley April fairy stamped her up in black moments and coloured her in with my copics. I then fussy cut her out (nothing to do with not taping down the die properly when originally cutting the oval...). I restamped her on a spellbinders floral oval which I inked whilst in the die with chic violet colour cloud. I added her back onto the oval and added glossy accents for the water and glossy accents covered with glamour dust for her wings.
I added some purpleyblue card to a 6x6 card blank using tattered lace pin dot squares to tie in with the pin dots on the oval. I finished it off with a few flowers and some foliage from one of the first dies I ever bought. It's a Marianne one and doesn't have any release holes so I usually end up throwing it onto the tiled floor to release the paper! Hopefully on the second picture you can see the glossy accents better. It's gone very dark and gloomy here in Lancashire so it might rain, or like this morning have a go at snowing again. It's no wonder us Brits talk about the weather a lot, it never stays the same for more than an hour! Hope you're all having a sunny day x

Monday 28 March 2016

Lead me not into temptation


The lovely Megan J gave me the heads up that my shoes card would fit in with the current challenge at House of cards as the March challenge is silhouette. Given that I have several of the stamps sets in the range that haven't yet seen ink, I decided to make another card to enter the challenge. This time I glittered the cocktail, after all who doesn't like sparkling alcohol! I tried to show the sparkle of the glitter in the second pic, but it's so dark and gloomy at the moment, no doubt more rain is on the way.
As you may have noticed, I'm blogging rather than stash sorting. Hubby phoned at half eleven this morning to say that he was just outside Birmingham on his way home. The competition today had been cancelled due to the storm that hit overnight. Obviously this meant that I wasn't going to have until seven tonight to sort things out. Fortunately I'd finished sorting out my dies and stamps which had been taking up most of the floor and the combined stamp and die sets whilst not all sorted in the packets, were at least in one box. So, with the floor in this state

I just tidied the boxes away and tried to find the surface on the kitchen table again. The coffee table of craft at the back of this picture will just have to wait for another day. Hope you're all enjoying your Easter Monday and that you're not rescuing your fence from your neighbour's garden! 

Sunday 27 March 2016

Saturday 26 March 2016

Twofers - shoes


The challenge over at Twofers is shoes. Now I wanted to take part as they are such a fab group over there, but shoes? Now the only things I own that involve shoes are a CD-ROM which I think is currently in the storage lockup and a freebie tattered lace shoe die that came with crafts beautiful magazine and which is um..I have absolutely no idea where it is.
I then remembered that creative expressions did a series of silhouette stamps with girly sentiments one of which was a Marilyn Monroe quote about shoes. So I set to rummaging. I think I have all the stamp sets apart from that one! Then inspiration struck, if I stamped the image and then added cosmic shimmer glue and glittered just her shoes, would that count? I swapped the sentiments over as I thought that sentiment worked better with this image to highlight the shoes. The shoes have turned out a bit Dorothy, but I wanted a strong colour to stand out against the black and red was the only bright glitter I had. Hopefully the second image shows the sparkle better. I used Simon says stamps stitched rectangles and added a bit of faux stitching to the shaped card blank.
Twofers people - feel free to delete me from the challenge if you don't think I've met the theme. I had fun playing about anyway!

Friday 25 March 2016

House mouse and friends - pastels


Just sneaking in a third post for today before I toddle off to bed. The current challenge over at House mouse and friends Monday challenge is pastels which closes soon. Fortunately I had cut out some Housemouse images from the Joanna Sheen CD-ROM when I had my fussy cutting binge the other week and so thought this one in my favourite colour of pastel would work. Apologies for the poor photo, it's actually lighter than it looks, but a bulb has gone in the kitchen which wasn't helping!
I decoupaged up the image and added glossy accents to the centre of the feeder. I used lilac and kraft card to layer up the image. The leaves were cut out of pale green coredinations cards, it's actually a corner die (possibly crafty Ann?) but I snipped it to lie straight. I added a flower made with my ancient daisy punch and a dazzler to the centre of the flower. I'm off to bed now as it's half ten, but I keep laughing at the last leg on TV so might have to stop up for a bit! Sweet dreams to you all x

Happy Easter oldie

K

I'm joining the lovely Erika for Oldie Friday again, where we share a crafty project of any sort from the archives. I think I made these cards last year, or it could have been the year before!
The papers are from a lili of the valley pad and I think the majority of the dies I used were from io. No idea why I chose to put bunnies on my Easter cards rather than chicks! My two bunnies are currently snoozing in the corner of the run that catches the sun. It's a hard life being a bunny. I'm supposed to be making a card and some ATC's for an end of the month swap, but I've found reruns of bake off on telly, so....

Fab n funky - flowers


Let's get the formalities over with first - I'd like to enter this card in the Fab n funky challenge - flowers.
A happy accident led to the making of this card. I subscribe to Simply cards and Papercraft magazine (nothing to do with the offer of 12 free spectrum sparkle pens). I got an email from them this week apologising for sending out the wrong free gift with issue 148. It should have been a rose stamp and embossing folder but by accident they sent out the free gift due with the next issue. So, if you fancy getting this Altenew clear stamp set and dies, buy issue 149 when it comes out on 21st April!

As usual I forgot to take a pic before I took the stamps off!
Back to the card. I don't have many coloured ink pads and so I used red geranium archival ink and used the second, third and fourth generation stamping. I found it easiest to start with the smallest stamp section to line up the image. I used first, second and third generation stamping of olive archival ink for the leaf. Although dies are included I fussy cut them all out. I ran round the edge of the roses with an alcohol pen. I assembled the card with tattered lace square and pearl square layers and added the centre flower on foam tape. The sentiment is from a Winnie and Walter set.
As I had a few bits left over I made another card. This time I used Tonic pin dot circles and squares and used the sentiment that came with the set.
I hope you're all enjoying Good Friday, the sun even came out for a bit here in Lancashire! I'll be back later to share an Easter oldie.

Thursday 24 March 2016

Bah Humbug


The theme over at 52 Christmas card throwdown this week is to use a funny sentiment. Given that the sum total of Christmas cards made this year is um, one. I thought I'd challenge myself to double it!
I'm hoping that this card meets the criteria as it's just a bad pun, rather than funny!
I used the Hobby Arts Baa Humbug stamp set (they have an Easter sale, 15% off clear stamps, just saying). I stamped one of the grumpy sheep direct onto a 4" square card and then stamped the Christmas lights on him and some tufts of grass. I coloured him in with my copics so I added an insert to hide the bleed through. I wanted to give him that proper English winter look to really annoy him and so left the grass green with just a dusting of snow collecting on the sheep and grass with a mix of flower soft polar white and glitter jewels glitter. I added some glossy accents to his eyes, stamped the sentiment from the set and squiggled a border with a fine liner pen. Ta dah! Doubled the number of Christmas cards made to 2!
Dare I confess I was walking around the house making sheep noises whilst photographing this? Just as well Hubby was at work really...

Butterfly challenge - M is for margins and/or mint


Gosh, it's a grey and miserable drizzly day today and I'm still feeling decidedly under the weather after someone kindly shared their cold with me. That is my excuse for what happened yesterday....
I was determined to create something and so when I saw the latest Butterfly challenge - M is for margins/mint I figured I'd have a go (especially since I was a top three pick for the last one, just thought I'd slip that in there)
So, I needed a butterfly and there across the room was the very thing.
My goodie bag from the weekender had a butterfly on it! (Yes, that dumping ground is my lounge, now you understand why I need to tidy up this weekend)
So, I roughly cut out the butterfly and backed it on some card to strengthen it and fussy cut it, amputating its antenna. I coloured it in with a mix of jade and holly green spectrum noir sparkle pens to give it that butterfly shimmer. I embossed some craft card and then built up some mats and layers fir the margins. I used jade mint chalk paint to get the mint layer as I couldn't lay my hands on the right shade of green. I added some crochet lace and in the goodie bag were some self adhesive pearl strings so I bunged them on to further highlight the margin aspect. I stamped the sentiment from a sheena set in Kraft card and then swiped the edges with the chalk paint to add some definition. Simple right? 
Well, the card didn't quite look like that originally. I stuck it all down and drew the antenna back on and then a few hours later decided I didn't like the layout. So I pulled off the butterfly and sentiment, which damaged the card slightly and I was stuck with the antenna so I had to rearrange things to cover those areas. Originally it looked like this,

The space in the bottom left corner was what bugged me the most! The colours are actually closer in this picture though. Hopefully you agree that the new version is the improved one!

Wednesday 23 March 2016

What's on your workdesk Wednesday.


Morning (by 5 minutes) deskers! Apparently it's Wednesday again and so it's time for us to join Julia and share the contents of our work desks or in my case share the state of the kitchen table.
As you can see I haven't prettified my desk for your visit. Centre stage are a pile of craft magazines and TV guides that were unceremoniously dumped there last night so that there was room for Hubby on the sofa. The observant amongst you may notice a few post it note masks of those Owls lurking to the right of the glass mat. Oh yes, I've been making more things with those Owls (quite why auto correct insists on capitalising Owls I don't know).
There is just stuff piled up everywhere else on the table. Hubby is away over the Easter weekend. Some competition shooting air rifles at targets in a field whilst being rained on and having gales blowing you away or something (it is a bank holiday in the UK and so the weather is guaranteed to be pants). I'm intending to have a craft sort out in his absence as I can leave stuff all over the house whilst I do so. Check back next week to see if you can see space on the table!

Tuesday 22 March 2016

All of a twitter...


Thank you for all the advice about the owls. As usual you were totally right and the cards have been left as they are.
Today's card was inspired by the way I had stamped the Owls on the scrap card to get the white bits I needed for the paper piecing.
I thought they'd look cute looking into a card. I used a 4x4 Kraft card blank and stamped them and the sentiment from the set. I'm loving colouring on Kraft with my spectrum noir pencils at the moment. I simply coloured them in and added some glossy accents to the eyes and beaks. In hindsight I should have used a white gel pen rather than a white pencil for their eyes to make them pop a bit more. Right, the weekly shop calls, have fun!

Monday 21 March 2016

Everyone's a critic!


Hope you all had a lovely weekend. We met up with my parents at Barton Grange garden centre yesterday. Barton Grange is probably most famous for its urinals in the shape of flowers. You can even buy a postcard showing the flower urinals with the caption "I watered the flowers at Barton Grange". Sadly, the ladies loos are less exciting, just sinks that look like large hollowed out pebbles.
Right, enough waffle and back to the title. Mum visited me on Thursday for a chat and to help me clean out the bunnies (and really to play with them as she loves them as much as I do. She came with me when we went to see the lady who was getting rid of some of her rabbits and Mum said we were taking Bramble before I got a chance to say a word!). Anyhow, Mum saw my sea scene and claimed  it to take home with her. She told me whilst we were in the toilets today that Dad had said it was very good. However, he thought that the boat would be better at an angle as the sea looked rough. Critics everywhere!
Your turn to be a critic now. I started making the owl cards (Woodware stamps I think) at the same time as the bunnies for the spots and stripes challenge using papers from the same Docrafts pack. I paper pieced the owls using some scrap white card to stamp the eyes, beaks and flowers. I added a little colour and shading with spectrum noir pencils and some glossy accents to the eyes and beaks. I stamped the branch from the stamp set but stretched it slightly on the acrylic block to elongate it so the owls fitted better. I coloured the branch and flowers with the pencils and stuck on the flowers. I added some faux stitching around the Kraft card base and then with my usual lack of planning stamped the sentiment. This is where I need your critical crafting eye. I can't help but think that they need something  in the top left corner to balance out the sentiment that I bunged on without thinking about it. What's your opinion? Does it need something and if so what? Answers on a postcard or just in the comments section!
I'm going to take these cards over to The snippets playground as I used white card from a failed card blank from the bit box to add the details, see picture below! I wonder if we can toast hot cross buns in the treehouse?


Sunday 20 March 2016

Spots and stripes for Easter


The current challenge over at Fab n Funky is to use spots and stripes. I decided to do some paper piecing again, but this time chose a more sensible image! I used a woodware bunny stamp and stamped it twice on different papers, spotty and stripy. Then set about mixing it up, this had the added benefit that I ended up with two cards. I stuck the bunnies on 6x6 kraft card blanks and then added a little colour and shade with spectrum noir pencils. I added in some faux stitching round the edges with a white gel pen to tie in with the stitching on the bunnies. I've added in a second picture so you can see the spots and stripes more easily. The stamp set came with an Easter sentiment, however even though I'm sending these as Easter cards I left it off. The cards are going to two friends off the rabbit forum and they can leave them up then as long as they want. Hope you all have a lovely Sunday. Hubby and I are off to a posh garden centre to meet up with my parents for a coffee as it's roughly halfway between us.

Saturday 19 March 2016

Bunny love


Happy weekend everyone! Can I start off by thanking all my followers and those who leave comments, it really means a great deal to me. I've been off work since August and have only felt well enough to blog since January and I'm sure the wonderful blogging community has contributed to my recovery. You really are all wonderful creative and caring people.
Today's card was inspired by this one by Pen sunshinepen. I wanted to make a card for someone on the rabbit forum who lost her bunny suddenly and is going through a tough time generally. I used clarity stamping card and stamped and masked off the bunny and put a mask down for the moon. I cut a wavy cloud shape out of paper and built up the sky with a mini blender tool and distress ink. I did try using a smoothie but I discovered that the starlight paint was still clinging in the foam and the teeny tiny sparkle in the paint transferred to my distress inkpads, so they now sparkle! I used a torn bit of copier paper and the same technique to add the land. I stamped in a few grasses from the wee foliage set in black and a branch across the moon and a bit of shadow to the moon. To add a bit of shimmer I added some clear wink of Stella to the moon. I die cut and layered it up and stuck it onto coredinations card with foam tape and stamped the sentiment from lili of the valley.
Now, I know I've bored you to death about last weekend, but I unpacked my apron this morning and found my name badge on it so I have to share!

And finally another bit of crafting by someone else. I was lucky enough to be drawn out of the cup of chance on create and craft a few weeks ago when craftwork cards were on with cute bunnies and this arrived a few days later in the worlds biggest padded envelope, considering the card is about 5x5 and the envelope was A3!


Friday 18 March 2016

Oldie Friday


It's Friday, so it's oldie time! I'm joining Erika for Oldie Friday where we share previous crafty makes of any kind from the archives. Once again I'm showing a cake that I made for my Dad's birthday.
Apologies again for the poor pic, it's another photo of a photo. Now, there's a story behind this birthday cake that I made for my Dad. I guess I was about 19 or 20 at the time and as Dad's birthday is in summer I was home from uni at the time. Being a teenager ish  I enjoyed a nice long lie in, especially at the weekend. Dad however is an early riser and so pretty much every Sunday I was woken up by the sound of him jet washing the cars. At the time we had three cars at home and a motor caravan and so this would go on for quite some time! When it came to making his birthday cake, I knew exactly what to make.
I modelled Dad and the pressure washer out of fondant icing and then piped some royal icing out in lines on greaseproof paper and once it had fully dried carefully positioned them on top of the cake securing in place with a dab of royal icing. I wanted to put the motor caravan on the side of the cake (an Autosleeper Legend) and so I found a picture of one in one of Dad's magazines and traced it and transferred the shape onto a sheet of fondant icing with a pin and then cut it out with a knife. 
Hope you all have a great weekend and if you're off the the NEC I'm officially jealous!

Thursday 17 March 2016

Creative Cart Blanche - #2 Triple trouble


So I came across the Creative Carte Blanche challenge from Hels Sheriden's blog. Doing mixed media work is something that interests me but which I've never really tried or had the confidence to try. I decided I was going to have a bash as the current challenge is to include corrugated, lace and metal. I had an initial concept working with a dressmakers form, but we all knows what happens to the best laid plans...
As I've mentioned I had a blast at the InkBuds weekender and so decided that I would crack on with this week. Well, whilst I was recovering on the Monday, Nigel the DPD driver turned up with a set of stamps and mdf shapes from creative expressions. To quote Gru from Despicable Me "Lightbulb!"
So, I had a blank plaque from Joanna Sheen and I added layers of blue and purple chalk paint as a base. I added some cardboard to create the cliffs. I layered up strips of tin foil to create the sea and tore up some lace to add to the sea texture. I ripped up some tulle to add texture to the sky. I used a mix of cosmic shimmer glue and glossy accents to stick it all down. Once dry I painted the sea with more purple, blue white and black chalk paint and the cliffs with brown, black and white chalk paint.
I stuck washi tape, paper and ribbon to the mdf boat and seagull to add some texture and then after a white base coat built up layers of chalk paint and dry brushed on some black to add dimension. I used   cut n dry foam with the chalk paint to add in the sky and some indigo blue metallic white to form the clouds, hopefully the picture below shows the subtle metallic.

I decide to add some white pearl cosmic shimmer PVA to the waves. Unfortunately the nozzle had got clogged and so I removed it, unclogged it and squeezed. Of course the nozzle came off and the PVA covered my glass mat! So I dunked my finger in it and dabbed it on that way. I also had some silver pearl PVA which I unclogged carefully this time and applied that to the waves. It still needed something so I decided to throw on three things to stick to the PVA and a bit more cosmic shimmer glue that I'd added. I scattered glamour dust, cosmic shimmer crystal chips glitter jewels and clear micro beads to give the sea more life, hopefully some of the sparkle shows up below.

I glued on the boat and seagull and added some twine from the kitchen to hang it up after it dries and stops shedding micro beads.I'm not saying it will win any prizes in the art world, but I had great fun playing!
A final view to show you the dimension.

Hope


I made this card for my friend on the rabbit forum who is struggling at the moment. She actually posted this quote on another thread there and so when I saw the stamp set from Stamp Addicts included it I had to have it.
I used a paper from the English Garden 12x12 paper pad that was on a creative expressions show a few weeks ago (l might have purchased it as there were bunnies on one of the papers...) on a 6x6 kraftcard blank. I added clear wink of Stella to the feathers although it doesn't show in the photo and faux stitching. Stamped the sentiment onto white card and die cut it with Simon says stamp stitched rectangles and mounted on foam tape. I made a couple of feathers out of the white card waste and used a bit of twine to add a bow. 
In hindsight I shoul have used cream card or knocked the whiteness back a bit with some ink, but hey ho. I hope the sun is shining where you are and that you enjoy the day x

Wednesday 16 March 2016

What's on your workdesk Wednesday


It's Wednesday again and so it must be time to join Julia to share the contents of our workdesk. Once again, my kitchen table is in need of a good tidy up (regular readers will be spotting a theme here). I really must get in the habit of tidying up one project before starting another.
So on the table of shame today you can see a project that I've been working on for a challenge which has involved getting very messy. To the left, perilously close to the paint is a beautiful English Garden 12x12 paper pad that I actually managed to cut into to make a card, which is balancing on top of my cut n boss waiting to go into an envelope and into the post. On top of the paper pad to the left is an mdf storage unit that I bought at the weekend (I forgot to confess about that on my shopping spree!) I glued it together yesterday but need to think about how to decorate it.
Apologies if I don't get round to commenting on your blog straight away or if my comments are brief. My GP has increased my morphine, but I'm still suffering from my brilliant crafting weekend and typing makes my shoulder throb! I hope you all have a wonderful creative week x

Tuesday 15 March 2016

Butterfly challenge #50 buttons and/or bronze


So the challenge over at Butterfly challenge is to add buttons with the optional colour choice of bronze. Now I don't have many butterflies and certainly not statement butterflies in my stash ( I know, appalling right, and certainly something that needs rectifying) but in the words of Baldrick I had a cunning plan...
I didn't have any bronze items but I used that as a starting point for my colour scheme. I started off by painting an mdf heart (dreamees I think) with umber and warm stone chalk paint. Once dry I stamped little butttons and butterflies (freebies from magazines) in vintage photo and aged mahogany ink. I sacrificed a butterfly off my water bottle from the weekend that was in a browny card and sponged on some topaz starlight paint. I also sponged 3 white buttons with the starlight paint and edged the mdf heart with it. Once dry the butterfly had a bit of a crease in the middle where I'd pulled it off the bottle so I bunged some gems down it. I then assembled the heart with some additional gems, pale brown roses and a couple of old die cuts that were lurking in the box of "shove in any possibly useful bits when tidying up" bits. Finally I added a bit of gold organza ribbon to hang it from.

The InkBuds weekender - Sunday


So we started off on Sunday with a plain bog standard photo frame. Obviously I haven't got a picture of it naked, so hopefully you can get an idea of how it started life from the back.
After we'd finished it looked like this!
As I mentioned yesterday we were able to pick our own colour and choose our own text to add to it. It would have been easy for them just to print off a phrase and get us to use that, but no, they brought an old fashioned typewriter with them so we could type whatever we wanted. Boy, do typists have my respect, we forget how easy with have it with modern keyboards now! All the flowers started off as white and we coloured them to match our projects.
I said yesterday that Hels and Pauline's attention to detail was fab, this is the water that we had each day. It was too pretty to drink, so I made do with the tea, coffee, fruit teas, squash, Diet Coke and diet cherry coke instead!

I can't wait for the next weekender, the projects haven't been finalised but are likely to be bookmaking and a niche canvas. Hels and Pauline make a great comedy double act, I learnt so many techniques and now have the confidence to get messy. Can I have the cheque now please?! Seriously, if you get a chance to go to their workshops you'll have a great time. I went on my own knowing no one and now feel like part of a wonderful community, much like the wonderful blogging community. Can we have a group hug?
Oh yes, I said I'd fess up about what I bought..... 
Look, I saved £15 okay!

Monday 14 March 2016

InkBuds weekend - Saturday


Morning, it's a beautiful sunny morning here in Lancashire and the bunnies are sunbathing in their run.
I had a fab time at the weekend at two InkBuds workshops with Hels Sheriden and Pauline Wheeler. They are such entertaining ladies, the sort of people that you feel like you've known forever 5 minutes after meeting them. I can't remember the last time I laughed so much as we had great ladies in the workshops too with friendly banter being batted around the whole time. Just don't ask them about the hotel room and wetting the bed!
In between the laughter we did actually do some creating and learned new techniques. On the Saturday we made the perpetual calendar shown although you could easily use it as a letter rack, crafty storage etc. There's other decorations on the sides too, but that's for my eyes only! 
I was very impressed with the details of the workshops, for instance rather than stencilling on the writing we had professionally made vinyl transfers to add to give a really crisp finish against the distressed background and we were able to choose our own colours to work with. They even nipped into the craft shop where it was held and bought extra colours if needed for us to have the colours we wanted.
We all got goodie bags and personalised name badges and they did spot prizes during the day too. The whole day was really relaxed with plenty of time (and drinks and cake and sweets) to repeat demonstrations and help as required, but without feeling like time was wasted or rushed. Sadly my pain was pants by the end of it and kept me awake during the night, but it was totally worth it! 
Amazingly, the craft shop is letting them back again (they've obviously not noticed the mess where I was working then) and so they are plotting, sorry planning another weekend  in June in Preston. The InkBuds are planning on touring the UK, I think a workshop in Coventry was mentioned so if there's enough demand and there's a village hall or something they'll come to a venue near you! Apparently you can track them down on Facebook, I'm still refusing to join Facebook, but my resolve might be weakening....
I'm off for another lie down now, but will be back tomorrow with the project I made on Sunday and I might admit to what I bought in the craft shop who gave us a generous discount for the weekend (just don't tell Hubby!).

Friday 11 March 2016

Not such a bright idea!


The current challenge over at Fab n Funky this week is paper piecing Now, as I've mentioned when I'm in the right mood I enjoy settling down with a bit of fussy cutting so this was right up my street.
This was when I had my not so bright idea. I had a woodware stamp of a row of flowers that I'd not yet used. Aha, I though the flowers would look quite nice paper pieced. So I got out the stamp and stamped it on a sheet of white card. Okay, I'd forgotten about all the fiddly leaves and tiny flowers. Never mind I thought, I'll do the main flowers and just colour in the fiddly bits. So I had a rummage in the bit box and found a bag of bits marked "spring", obviously this meant something at the time, but all the scraps in there coordinated, so just have been from the same pack. They'd obviously been there some time as I just shove stuff in the box now!
So I did the main flowers and then thought, I'm not being beaten by this and so paper pieced all the fiddly bits. Definitely a labour of love! I then decided it needed a sentiment so I called upon the stamping gods, who were in good mood and after a couple of practice runs on scrap paper I managed to stamp the lili of the valley sentiment. I die cut it out using the largest tattered lace pin dot rectangle (using sooo much tape to make sure it didn't move) and trimmed a mat of dark pink to fit. I folded a sheet of A4 Kraft card to make a base and trimmed it down. As a finishing touch I added a little glamour dust to the centre of the flowers with a quickie glue pen.
I'd like to enter this card in the Snippets playground as the flower papers are from the bit box and of course in the Fab n funky challenge If I have any "bright ideas" in the future will some one point me in the direction of this post!

Oldie Friday


Once again I'm joining Erika for oldie Friday where we show crafting projects from the archives. I recently stumbled across some old pictures in my photo bucket account. Apologies for the quality but they are photographs of photographs. This was a birthday cake that I made for my Dad. I seem to remember watching a programme that came from the garden festival in Wales where they were decorating cakes using an icing made with gelatine that means that it sets rock hard. A quick google dates this back to 1992, so I must have been about 19 when I made this cake.

Dad loved holidaying in France at the time and so that was the inspiration for the cake. I made the gelatine icing and then moulded croissants, baguettes, grapes and French flags out of it. I traced the outline of France onto grease proof paper and rolled out the icing and then trimmed it to shape. Dad was thrilled with the cake.

I've got a great weekend coming up. I'm off to the craft shop in Preston for 2 days of workshops with the InkBuds - Hels Sheriden and Pauline Wheeler. They say to take gloves if you don't want inky hands, so sounds like fun!

Thursday 10 March 2016

Peacock


So I was browsing blogland late last night and I saw Liz's post using a peacock die that she had got with a craft magazine. It reminded me that I had the die too and as her card was so great it inspired me to have a play.
Amazingly, this afternoon I actually managed to find the die! I cut it out of greenish card three times and then snipped and glued to layer his tail up to make it fuller as in my head, peacocks have bigger tails. I die cut the largest spellbinders floral oval in gold and some mats with spellbinders ovals. I thought the white looked a bit stark against the green and so I added summer skies colour cloud to the smallest oval. I found a bit of die cut branch in my "bung in everything left over on the table and vaguely useful looking" box and added that. I added some glamour dust to the peacock and some gems to his tail. I would have liked slightly smaller gems but I didn't have enough in the right size. A small black gem highlighted his eye. I used the tonic pin dot dies on a 6x6 card base to finish it off. Thanks Liz for the inspiration!

Wednesday 9 March 2016

What's on your workdesk Wednesday


It's Wednesday again so I'm joining the lovely Julia for what's on your workdesk Wednesday whilst putting off going to Tesco's as it's chucking it down outside, 
My desk aka the kitchen table is showing the abandonment after making a card on Monday. On the far left you can see some house mouse decoupage that I've actually assembled. I have a tendency to cut things out and then never get round to doing anything with them, I just enjoy the cutting out at times. Dumped in the middle of the desk are three packs of acrylic felt that the rather soggy looking postie delivered this morning (a bargain at £6.15 for 30 sheets and thicker than I expected) I'm planning on making some Easter decorations with it but I'm not specifying which Easter they're for!