Thursday 4 October 2018

The Flower Challenge - #25 “Add sparkle” for our 2nd Birthday

Time flies! Not only is it October already, but it’s also our second birthday at The Flower Challenge and this month we want you to “Add Sparkle” to your creations.
Please head over there to join our celebrations, we have some fantastic prizes up for grabs this month too! Please make sure you check our rules to ensure that you're in the running for a prize and if you include our cue card in your post, we'll love you even more than we already do!
I used the latest members gift from Create and Craft which was a stamp set from Stamps By Me, to create my card. I stamped it in black archival ink and then totally stole our lovely leader, Aileen's idea to use my zig clean colour pens and use a tonic glitter pen, rather than a waterbrush to pull out the colour, giving a lovely sparkle to the image. I also used a gold glitter gel pen in the centre of the flowers to add some more sparkle.
To assemble the card I die cut a gold mirri frame using tattered lace torn edge rectangles and added a sentiment using The Paper Boutique's Sentiments Vol 2 die set in black card. I trimmed down the 5x7 card to give a roughly equal border around the frame. I fussy cut the floral image and then added it onto the card with 1mm deep foam tape. Simples.

Tuesday 4 September 2018

The Flower Challenge #24 - Anything Goes


Yep, it’s everyone’s favourite over at The Flower Challenge this month as our theme is “Anything Goes”
We're also super excited that we have an amazing new member of our design team and even more exciting we have a fantastic prize for this month's winner.
I might have been very naughty when Stamps by Me were on Create and Craft recently, which resulted in my craft stash pile growing ever larger. I just loved the combination of stamps and large die plate and so picked the "Enjoy the moment" stamp set and co-ordinating die.
I die cut the panel first and then stamped in versamark onto the diecut using my misti and then heat embossed it in white. I then settled down with my polychromos pencils and enjoyed colouring it in. I faffed about for ages deciding on what to put behind the die cut, but eventually decided to use kraft card again and 1mm foam tape to add dimension. I slightly regretted the foam decision when I realised how many fiddly bits there were though! 
I wanted to add a sentiment and so heat embossed the LOTV sentiment on a strip of vellum and then wrapped it round the panel and secured it with red liner tape. I took a 5x7 card bank and trimmed the height down slightly so that there was an even border all the way round the panel, which I glued into place.
As ever the DT will be back halfway through the month with some more inspiration for you, we can't wait to see your creations, but please take note of the following as we hate having to disqualify an otherwise amazing project. 
  • Please don't forget to use your Florals as always and as the MAIN feature on your card.
  • Only 6 other challenges allowed as well as our own.
  • Also please take a few minutes to read our rules in the tab at the top of our blog as you may miss out on winning a prize if you don't follow all the rules.

Monday 3 September 2018

Happy Birthday (apologies for the blurry photo)

Yep, another rustled up at the last minute card. My sister's this time. As ever I suddenly realised it was her birthday the next day and fortunately I had a bag of Altenew flowers and leaves etc lurking on the table. I hurriedly arranged rather a lot of them on a 6x6 card base and secured them with a mix of foam tape and glue. I found some co-ordinating card and die cut the sentiment using a die from Hixxysoft-Deco something make! I doodled in a border and job done. The rather dodgy photo was taken using my phone on my desk at work before I popped it in the post. 

Sunday 2 September 2018

Tracy Scott Workshop

I was lucky enough recently to attend a workshop run by Tracy Scott, designer for PaperArtsy, up in Carnforth. We made this piece on 12x12 grey board, so it's slightly warped in the photo from heat drying some of the layers, but has since flattened out nicely in a box frame and has been stolen by my Mum!
Tracey prefers to use grey board as it allows the collage layers to bend into it more seamlessly than they would on canvas. We used a couple of layers of collage and multiple layers of paint and stamping to create this piece. I'm in love with PaperArtsy gold paint, used on and around the edges of the piece, it's a lovely cool gold and not brassy at all.
Apologies for how wonky the photos are, but they show the dimension and the last one shows the true vibrancy of the piece. 

Saturday 1 September 2018

Stampin' Bella Tiny Townie Butterfly Girl Brianna

Coooooeeeeeee! Anyone still out there? I know my blog has been home to nothing but tumbleweed lately, but my mission for September is to blog daily and try to keep up with visiting all my lovely blog buddies out there.
This is a card that I made for my niece's birthday back in April that I don't think I've shared yet. It was one of those, oops it's her birthday tomorrow cards that was rustled up for leftover bits lying around. I'd spread some glitter paste through a Dutch Doobadoo stencil on a 5x7 card base when playing with the then new Clearly Besotted sea themed stamp set. I'd stamped the Stampin' Bella Brianna stamp and coloured it with my copics a while ago and so fussy cut that out and added it to the card on 1mm foam tape. A rummage in the die cut bits box yielded the sparkly dangly hearts (Memory Box I think) and I added them to the card. I also found a couple of the happy birthday die cuts in different shades of blue. I glued two together to give more strength as they were going over the sparkle paste in places and glued them in place. To finish, I added a doddled border to the card and some glitter to her wings. Not the best card I've ever created but certainly one of the quickest. I think my niece likes it, although she probably liked the gift card that was enclosed in it more!
I can't believe it's September already, this year has really flown by. I'm going to have to get cracking with my Christmas cards soon. I hope you all have a great craft filled weekend x

Saturday 4 August 2018

The Flower Challenge #23 - One Layer Card


Well, my poor blog has been neglected of late. Unfortunately, life has thrown quite a few things at me recently, but hopefully things are gradually improving now.
Our new challenge this month over at The Flower Challenge is to make one layer card(s). Never the easiest of challenges, but my teamies have created some great inspiration for you.
I made a super simple card for the challenge using Taylored Expressions Bloomin' Background stamp. I simply stamped it onto my card bank on black archival ink and then stamped the sentiment (possibly from a Winnie & Walter set - but can't find it again to tell you) and that was the card ready for colouring with my zigs. The background stamp is 4.5" x 5.75" so I stamped on a 6"x 6" card base and then trimmed it down a little. See, one layer cards are nothing to be scared of! 
I hope you all have a fab weekend and manage to get some crafting done, hopefully involving a floral theme on one layer!

Sunday 8 July 2018

Sweet Stampin' - Christmas in July


Arrghhh for some reason Blogger didn't post this scheduled post and I've only just realised! I'm sure they're trying to get us to abandon Blogger. I hadn't realised that we were no longer getting comments emailed to us. I'd assumed that as I had been pants recently at visiting and commenting on blogs, that people weren't commenting on my blog. Huge apologies for that everyone. It was only when it was mentioned on the flower challenge DT group that I realised! I also learnt this week that if you go into your blog settings and delete the email address that comments get sent to, and then re-enter the email it seems to work again! After all that waffling, I return you to our scheduled post...
Has anyone else melted? The warm weather is lovely, but just a little too hot for me. Perhaps as an antidote, our new challenge over at Sweet Stampin' is "Christmas in July". 

That said, I didn't go down to cool snowy route, although I might be regretting that now. I used the Clearly Besotted Trimming the Tree stamp set that was sat in my NBUS mountain.
I stamped the scene using memento black, masking off elements to create my scene. I then coloured the image with my trusty copics and die cut it using a Tattered Lace Torn Edge Square. I added a doodled border round it and did the same to a 5x7 card. I used foam tape to stick the image on the card and added some glamour dust to the star and baubles with a quickie glue pen. Simples!
I'm looking forward to seeing your creations this week, just remember to include some stamping to be eligible for our top picks. 

Wednesday 4 July 2018

The Flower Challenge # 22 - Monochrome

Has anybody else melted into a large puddle? If you are still in a vaguely solid form, perhaps you’d like to play along with us this month at The Flower Challenge, where this month we want to see your monochrome floral creations.
I applied creative expressions polar white glitter paste through a starburst stencil (indigoblu?) on a 6x6 card and let it dry, which didn't take long in this weather! I also used the Magnolia Memories stamp and die sets from Mel Heaton's new signature range for my card. I stamped the image in black memento ink and then coloured it in using my copics. I then used the corresponding die to cut I out.  I added a little sparkle with a wink of stella to some of the flowers before adding it to my card with 1mm deep foam tape. Simples.
Don't forget to check out what my lovely teamies have created to inspire you and please check our rules if you want to play along as it breaks our heart when we can't pick a stunning creation because they haven't followed our simple rules. We'll be back halfway through the month with a reminder and more inspiration for you. 
I hope you manage to stay at a comfortable temperature wherever you are in the world. I've got to bake 48 cupcakes tomorrow and I'm not looking forward to it in this heat x

Saturday 23 June 2018

Sweet Stampin' - Food and drink

Over at Sweet Stampin' this week we want you to use food and drink on your projects. I have to confess that I struggled with this theme. However, if you look closely at my card, you'll see that amongst my creatures from the Neat and Tangled, Beach Day set, you'll see that the hippo is eating watermelon. That counts as food right? And, I was impressed with how tenuous a link this is, they look like they're about to for go a swim in "the drink" aka the sea! Told you it was a rubbish link!
I fussy cut my elements from the set that I'd coloured with my copics and added them on 1mm foam tape to the card. I stamped the sentiment from a Waffle Flower stamp set and drew in a frame to finish.
I hope you all manage to stay cool as the weather here is likely to get much warmer next week. Luckily, I have a week off work, but not so luckily I'd planned to spend it giving the house a good tidy and deep clean. I may be a melty puddle by the end of the week... Stay cool!

Friday 15 June 2018

The Flower Challenge Reminder - Use a Previous Challenge

It's halfway through the month again (Seriously, where is this year going?) and so we wanted to remind you all of our current challenge over at The Flower Challenge and this month we want you to use a previous challenge for your creation.
I used our "Embossing" challenge and embossed a piece of white card using the centre of an 8x8 Tonic embossing folder. I glued this onto a 5x7 card base with a mat of purple/blue card behind it.
I had some flowers made from the JOFY 62 stamp set left over from the flower challenge card I made last month. I die cut the sentiment in black card twice and glued them together to give some more rigidity to it before gluing it on the card. I added the flowers onto the card with foam tape and added a gem in the centre of each. Truth told, I was going to add three flowers but in between deciding on the layout and sticking them down, I managed to lose one! That was a few days ago and I still haven't found it...it may have wandered off with my marbles.
We're all really looking forward to seeing your creations, but please remember to check our rules as we get upset if we have to disqualify a card from our top picks because it doesn't follow the challenge rules. Happy crafting x

Saturday 9 June 2018

Sweet Stampin' - Father's Day / For a Special Man

Yep, Saturday again (Yay!) and so it's time for our new challenge over at Sweet Stampin' and this time we want to see your makes for Father's Day or for a Special Man.
I was a naughty girl and had to rustle up a card at the last minute and so made a super quick and simple 4x4 card.
I bought the super cute Cooling Off mini stamp set from Clearly Besotted's June release and when it arrived earlier this week stamped and coloured in some of the images with my copics. I simply had to cut him out and add him to my card on some 1mm foam tape. I used the stamps " you are so" and "cool" from the set and stamped them in black archival. I also stamped the Father's Day sentiment from the Clearly Besotted, Build it Beaver stamp set on the card. I drew in a border to finish the card. I  would have added glossy accents to the ice lolly, but had to get the card photographed and blogged before it would have dried from milky to clear. I might add it now though.
I hope you all have a fantastic weekend and I'm looking forward to seeing your creations.

Monday 4 June 2018

The Flower Challenge # 21 - Use a previous challenge

I used our "Blue and Yellow" challenge for my card this month. I bought a few lovely stamp sets recently from Polkadoodles. I used two of the flower stamps from the "Delicate Doodles" set and the bees from their "Bee Nice Sentiments" set.
I stamped the flowers on some mixed media paper in black archival and stamped the bees too. I coloured the flowers in using Spectrum Noir sparkle pens and a waterbrush. Once dry, I added some dots to the flowers with a white gel pen. I stamped the bees on a scrap of card and after colouring them in cut them out. I mounted the panel on a piece of yellow card and used foam tape to add it to a 6x4 card blank. I added the bees, only gluing them down under the bodies so that their wings had some dimension. To finish I added some stickles to their wings.
I hope you enjoy playing along with us this month, and enjoy looking back over our previous challenges. We'll have some more inspiration for you halfway through the month x

Saturday 26 May 2018

Sweet Stampin' - Paper Piecing

Yay! It's the weekend again, and an extra long one here in the UK. Hubby has trundled off to Scotland for the goldpanning championships and I'm trying to catch up on some sadly neglected housework. Okay, and catch up on some sleep too!
It's also time for our next challenge at Sweet Stampin' and this week we want to see paper piecing on your creations.
I used Tim Holtz Crazy Birds for my card and stamped him and his hat from the accessories set on sheets from a 6x6 paper pad that I think came free with a magazine years ago. I fussy cut the images as my dies were trapped behind several large boxes of trophies and phials containing gold for the championships.
I trimmed down one of the sheets of paper to 4 3/4" square and then stamped the bird again so I had his feet etc on show. I then filled him in with the paper pieces. I stamped the sentiment (which describes me perfectly) from the Taylored Expression's Pitch Black set on the paper in black archival. My positioning of the bird and sentiment was slightly off, but I decided to live with it. To finish I drew in some ground for him to stand on and a border with a black fineliner. I then glued the panel into place on a 6x6 card blank. Simples!
I hope you all have a fantastic weekend xxx

Tuesday 15 May 2018

The Flower Challenge Reminder - Use Acetate or Vellum

It's halfway through the month and so time for a reminder that over at The Flower Challenge we want to see acetate or vellum on your creations.
As I used acetate for my card last time, I decided to use vellum this time. I used Brilliance ink in Moonlight White to stamp my image from one of the stamps from Rare Earth's "Inspired by the Orient" A4 stamp set. The brilliance ink dries on the vellum after a while, without needing to be heat set. If, like me, you feel the need to poke the ink to see if it's dry, it's advisable to stamp some extra bits to poke rather than mess up your main image. Don't ask why I'm telling you that!
Once dry, I coloured in the image with my polychromos pencils. I debated whether to use the coloured side or the softer reverse side on my card, but eventually decided to use the coloured side. I die cut a piece of apricot card using one of the Tattered Lace Pearl Square dies and glued it onto a 6x6 card blank. I then die cut the vellum using the next size down die. To secure the vellum I applied a bit of glue from a create and craft tape runner behind the coloured flowers. I also put a tiny bit of Cosmic Shimmer acrylic glue to my finger and spread it out so it was hardly there and applied a little to the back of the border corners of the vellum to secure those too. 
I then decided that I wanted to add a sentiment, yep, at the last minute when everything else was finished. Definitely flying by the seat of my pants! I stamped the With Love from a Uniko set, Flower Power 3 in the same white Brilliance ink and patiently left it to dry whilst my luck held!

Sunday 6 May 2018

Jo Firth-Young Workshops

Yep, I'm back in blogland! I even managed to survive a week in work! I can't believe how drained these chest infections and exacerbation of asthma have made me. I also managed to get oral thrush after three courses of antibiotics in 6 weeks. The only upside was that it wasn't itchy like it can be in *ahem* other places! Still painful though and the gel to treat it tastes pretty grim. I'm feeling much better though and starting to catch up with all those jobs that have been neglected.
Despite feeling rubbish, I still managed to make it to a weekend of workshops held by Rowan Tree Crafts. Fortunately, they were only about 20 minutes away from my parents and so I was very well looked after for the weekend, even if I was in bed before 8 each night!
The two all day workshops were run by Jo-Firth Young who designs the JOFY stamps for PaperArtsy. She's a great tutor and a lovely lady to boot, as is Sharon, who owns the craft shop. The sessions were held in the community room at the local retained fire station. Sadly (for us, but happily for the local community) there were no fires whilst we were there and so we didn't see any firemen.
On the Saturday, we made this lovely A4 canvas board using Jo's stamps and stencils. I've only got one photo of it as Mum claimed it when I took it back home to them that evening!
On the Sunday, we made the two A5 "box canvasses". They are actually made of canvas textured thick card and you fold them up to form the box canvas. Very clever, and they made stamping round the sides much easier as you could do it flat before you assembled them.


Despite not feeling great, I really enjoyed myself and would definitely recommend them to anyone.

Friday 4 May 2018

The Flower Challenge - Use Vellum or Acetate

Okay, who made it May already? On the positive side here in the UK we get not one, but two bank holidays this month and one of them is on Monday. Yippee! Double yippee, it's also time for our next challenge over at The Flower Challenge and this time we want to see acetate or vellum on your creations.
I used the PaperArtsy JOFY 62 stamp set that I bought when I did two fantastic workshops with Jo Firth-Young a couple of weeks ago. I used the same technique to colour the stamps that she taught at the workshop too, making colour puddles of purple and blue chalk paint and stamping onto them in black archival. I coloured in some of the bits on the stamps with black and white pens before cutting out the flowers. 
I took a strip of acetate that had been the backing for a Claritystamp stamp (as all my other acetate had gone walkabout) and dropped on blue and purple alcohol inks along with Ranger Silver mixative. I then used my finger or tilted the acetate to move the ink to create a pattern I was happy with and then let it dry (I discovered that my acetate wasn't heat proof when I tried to speed up the drying process!).
I trimmed out a piece of a 7x5 card base and then cut the acetate to fill the gap. I used red liner tape to secure the acetate and to glue a strip of the card base back into place. I used a black permanent marker to draw in a border to replicate the pattern on some of the flowers and continued it across the acetate section. 
I stamped the sentiment from a Clearly Besotted stamp set that was lurking in the table in black ink using my MISTI (as I hadn't thought to stamp it before I stuck the acetate on!). I shaped the flowers slightly with my fingers and added them to the card with a little red liner tape behind their centres. To finish, I added some sparkly bits to the centre of the flowers. Trust me, it looks better in real life, than my dodgy photo!
My lovely teamies and our fantastic guest designer have lots of inspiration for you, so maybe if it rains on Monday, you might want to craft an entry, and we'll be back with more inspiration in the middle of the month. 
I hope you all have a fantastic weekend. I'm hoping to get a little crafting done once I've had a good lie in tomorrow. It was my first week back at work this week and whilst I'm feeling much much better my breathing still isn't back to normal, so a good rest is on the cards. Love to you all x


Saturday 28 April 2018

Sweet Stampin' - Circles

Saturday again and payday yesterday, a great combination!
It's time for our next weekly challenge over at Sweet Stampin' and this week we want to see circles.
I started off by blending broken china and peacock feathers distress oxides through a Claritystamp bubbles stencil, moving it several times to fill the 5x7 card and overlapping some of the circles. I then used some Indigoblu pantry white paint to stamp some circles using various different sized bottle tops over the card. I used a quickie glue pen to add glamour dust to parts of some of the circles.
I had some prestamped, coloured and fussy cut elements from Clearly Besotted's Under the Sea stamp set left over and so I added these to the card and stamped the sentiment from the set. 
To finish I added some glamour dust to the fish and drew in a frame. Simples!

Monday 23 April 2018

Clearly Besotted - Under The Sea

I'm still alive! Still got a flippin' chest infection though, but hey ho. Sitting down whilst colouring is a good way to recuperate.
I couldn't resist the new mini Under the Sea stamp set from Clearly Besotted and so I stamped some of the elements in memento and coloured in with my copics, before cutting them out.
I used some blue glitter paste through part of the Dutch Doobadoo Wavy Lines stencil and once dry glued the elements in place. I added a doodled frame to finish and job done!
I hope you're all keeping healthy and creative out in blogland xxx

Saturday 14 April 2018

Sweet Stampin' - Animals

I know I say this every week, but where is the time going? I can't believe it's the middle of April already, although I'm very glad that it's the weekend again! I also know that you're suprised that after a fortnight of nothing, there's two posts on my blog in the same day. Honestly, I'm like a bus in that respect (I'm making no reference to my being the size of a bus these days!).
It's time for our next challenge over at Sweet Stampin' and this week we want you to feature animals on your stamped projects.
I used some more piggies from the Gerda Steiner, Wheek Wheek Wheek, stamp set to create my card. As before I stamped them in black memento, coloured with my copics and the fussy cut them. I die cut the purple frame with Tattered Lace, Pin Dot rectangles and glued everything in place on a 6x6 card base, including a few flowers that were lurking on my table. I stamped the sentiment from the set to finish. Simples!
Apologies, that I haven't visited any of you recently. After having a bad chest infection last month, I've not been feeling great and have been pretty much wiped out by the time I've finished work. This came to a head this week, when I picked up another bug. 
By Thursday, I was feeling terrible and so went to the walk in clinic by work. A triage nurse saw me within 5 minutes, and put me as a priority to see the doctor as I had a temperature, my blood pressure and pulse were high and my breathing sounded terrible, especially as I'm asthmatic. 
I saw the Dr about 5 minutes later and she spent a good 40 minutes with me, including getting about 20 puffs of salbutamol down me which upped my peak flow to 350 (normal for me is 470). She then made me rest in the obs ward for about 40 minutes before reviewing me and getting another 20 puffs of salbutamol down me. 
She then let me go with the instructions to make an appointment with my GP next week to review things and to go straight to A&E if my temperature didn't go down within the next two days or if I was struggling to breathe more as I was at risk of developing sepsis or pneumonia. She sent me on my way with the spacer device (volumatic for those who know these things) she used to give me the salbutamol and antibiotics and another inhaler.
I spent Friday resting, especially as I go lightheaded when I cough, and have scheduled this post so that I can have a lie in today! I'm missing not seeing what you've all been up to and will visit you as soon as I can. I hope you all have a healthy and happy weekend x

Less is More - Bring Something Back

I was thrilled to be invited to be a guest designer at Less is More this week, where the challenge is to "Bring Something Back", so basically use something in your crafting that you haven't used for a long time.
I had a rummage in my rather large pile(s) of stash and found these Clarity Stamp Bunnies, that hadn't seen ink for years, poor things! It also amused me that they were showing their backs (I know it doesn't take a lot to amuse me these days).  
I stamped the bunnies in black archival on a 6x6 card base and covered them with the masks that came with the stamps. I die cut a Tattered Lace Essentials heart out of paper and used this to mask off the rest of the card. I added a mask to create the moon and then used my MFT mini clouds stencil with Wilted Violet and Salty Ocean distress oxides to create the clouds. I used my Rare Earth ink brushes to add the ink as they allow me to be more subtle, as I tend to be a bit heavy handed with a blending tool.
I removed the moon mask and stamped in some foliage from Clarity Stamp. I also added a tiny bit of ink over the moon so it wasn't as stark. I spritzed a little water over the oxides and blotted it off after a few seconds.
I removed the heart mask and bunny masks and stamped in a few bits of grass around them (using another unlabelled Clarity stamp). I coloured in the bunnies using polychromos pencils and added a few highlights to the picture with a white gel pen. To finish, I drew round the heart to define it, not worrying about having a wobbly line. Simples.
I hope you have a great time finding something at the back of your cupboard to use and hopefully fall in love with it again. The Less is More design team have come up with some amazing creations if you need any inspiration. Happy Crafting!

Wednesday 4 April 2018

The Flower Challenge - Shaped Cards


April already, I've no idea where the time is going! I hope you all had a lovely Easter and are refreshed and ready to join in our new challenge over at The Flower Challenge and this month we want to see shaped cards, so not your standard square or rectangular card.
I used the Tonic verso Twisting Veranda dies for my card base, overhanging the largest basic shape slightly over the crease of my 8x8 card blank to make my base card. I then layered up the dies in cream and purple card to create the background. I stamped Heartfelt Creations Arrianna Blooms on some patterned paper (craftwork cards?) in black ink and cut them out. I then shaped and layered them up to form the flowers. I also diecut some more patterned paper in green tones with Sue Wilson's Bold Scrolled Vine die. It doesn't show up well in the photo, but this die has a lovely debossed detail to it. I tucked this behind the flowers including some snipped into smaller pieces. I die cut the Elizabeth Craft's sentiment in black card and added it to the card. To finish, I added some nuvo drops to the flower centres.
I have to confess to a mishap with this card. I finished it, put it down and realised that I'd stuck the sentiment on at a very wonky angle! I was determined to save the card though. The striped section was originally a cream die cut placed on top of the cream card. I managed to peel off the sentiment without damaging the stripes and then cut the inner edge of the striped border again out of cream. I then trimmed it down bit by bit to poke under the edge of the flowers without damaging them so it fitted back into the gap. I had to cut a few extra leaves to cover where I'd snipped in a little too far! I then had a problem that I'd die cut the sentiment out of the middle of the purple layer and didn't have any more of that colour. I decided to go with black in the end as I'd stamped the flowers in black. Finally I added glitter nuvo drops to the centre of the darker flowers and gloss lilac drops to the centre of the paler one. The paler centres looked too pale and so I ended up adding purple stickles on top of the crusted over gloss drops without squashing them. Finally something went right!
Along with the rest of the design team (check out our fantastic new teamies), we can't wait to see your shaped cards this month. Just remember to make flowers the main focus of your card and if you could include our cue card in your post we'd love you even more than we already do! Happy creating x

Saturday 31 March 2018

Sweet Stampin' - Bingo Board

Happy Easter! It's time for our new challenge over at Sweet Stampin' and this week we have a bingo board for you to play with. You need to pick a line, whether that's vertically, horizontally or diagonally. I picked sentiment, flower and cute for my card.
I bought this cute stamp set last weekend at my copic colouring class. If you own any copics, then I highly recommend you take Faye's class. I learnt lots and Faye is a great teacher and gives great hugs too! 
I love guinea pigs and owned two, but discovered I was allergic to them and came out in a rash when I handled them, so didn't get any more. I do miss the way they would start wheeking expectantly the minute they heard the key in the back door! My neighbour three doors down used to hear them too! So, I couldn't resist this Gerda Steiner Wheek Wheek Wheek stamp set. I stamped the elements in memento and coloured them in with my copics and cut them out. I also stamped some flowers from one of the very early Hunkydory stamp sets and did the same. I stamped one of the sentiments from the set on a dinky 4x4 card base and then glued the elements in place. Guinea pigs never stop eating and so I decided to stand him in a load of leaves and pop some on his head as my piggies (Treacle and Marmite) often ended up with veggies on their head as the rummaged for the best bits.
As ever, I can't wait to see your creations, you've got a week to join in and remember you need to use stamping somewhere on your card. 
Apologies if I haven't visited you recently, my chest infection really wiped me out and having a busy weekend and being back at work really hasn't helped. Thank goodness for a long weekend to recover. I hope you all have a fabulous Easter x


Thursday 22 March 2018

Richard Garay - Gold and Silver Full Bloom dies.

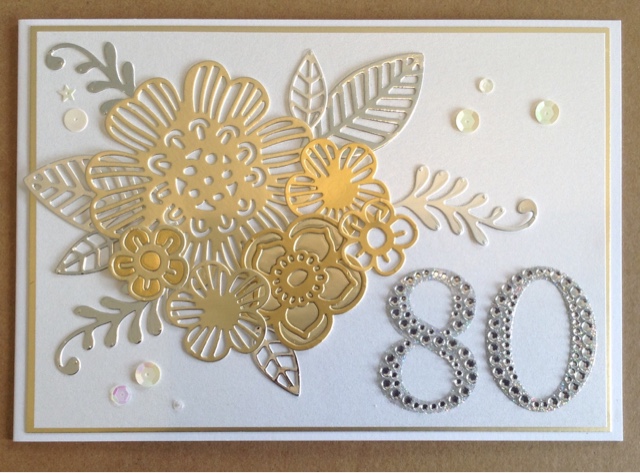
I thought I'd share the card I made for my Mum's birthday today. Given that time was short and I was still fighting off the lurgy I CASE'd the card on the back of the packaging of the Richard Garay Silver & Gold Full Bloom die set. 
I die cut the elements using various off cuts of matt and gloss silver and gold mirricard. The 80 was purchased at my local craft shop and was a quick way to add the birthday element as well as satisfying my Mum's love of bling. A few sequins finished the card. 
I've spent this week recouperating from my chest infection and so still haven't had any chance to craft or catch up. I'm off to the lovely Faye's copic colouring classes in Warrington this weekend so need to be recovered by then. Hope you're keeping warm and well, wherever you are x

Monday 19 March 2018

Clearly Besotted - One in a Million

Monday again and it's getting closer to the Easter break, thank goodness! Hubby and I made it up to my parents yesterday and had a lovely family meal with my sister and family to celebrate Mum's 80th Birthday. I was able to give Mum her belated Mothers Day card too. 
Supplies
6x6 card base
Clearly Besotted One in a Million
Fineliner pen
Rare Earth A4 Floral Background  - butterflies 
Dreamees Dinky Inkies to colour
Windsor & Newton Iridescent medium to sparkle the butterflies.
Nuvo drops for the flower centres.

Saturday 17 March 2018

Sweet Stampin' - Use your paper scraps

Saturday again, time really is flying by isn't it? That means it's time for our new challenge over at Sweet Stampin' and this week, we want you to "Use Your Paper Scraps".
I'll fill you in with the boring details of why I haven't posted or visited you all in a minute, so you can tootle off early if you prefer. I used some paper scraps (I think they were Scrapberry papers) that were left over from a workshop I did with the fabulous Hels Sheridan last weekend. I trimmed the scraps down with my guillotine to create a greater variation in sizes and then added them with walnut stain distress ink using a bit of cut n dry foam. I then stuck them onto a 6x6 card overlapping them in places. I added some more walnut stain round the edge of the card, although I was a bit heavy handed in places!
I found a reasonable sized scrap of card and stamped the LOTV sentiment in black archival ink and again added the walnut to the edges. I added this to the card with 1mm deep foam tape. I had a rummage in my bit box and found some paper flowers (I think from a Craftwork Card kit) which were roughly the right colours. To tie them in I applied a little of the walnut ink yo the edges of the petals and glued them to the card with some pearls for centres. Simples. I did think that maybe I should have stamped the sentiment in a dark brown rather than black, but hey ho!
So, why have I been absent in blogland? Life has rather got in the way. Work has been hectic and last Friday I pulled into the car park at work at lunchtime, using my pass to enter. Drove in and pressed up on my driver's electric and zilch happened. To cut a long story short, the window was stuck fully open and I couldn't get a garage to sort it that afternoon and I couldn't leave the car unsecured. Thank goodness for mobile phones! Eventually, we came up with a plan - as I needed my car over the weekend and for work. I drove the 60 miles up to my parents (50 miles of it up the M6!) with the window down, a thick cardigan and fleece on, gloves (thank goodness for grips on my gloves so I could drive in them) and two scarves wrapped round my neck and head. At least it wasn't raining! I then left my car up there and borrowed my Mum's car for the week whilst mine was repaired. I was supposed to meet Hels and Pauline (Wheeler) for dinner that night, but was shattered and so had to cancel it. Not impressed when they posted photos of their rhubarb gin drinking, I should have been there (on non-alcoholic drinks) too! 
I had a great time taking part in their workshops on Saturday and Sunday, although I'm always shattered by the end of them. Will share photos soon. I decided to have an early night on Sunday but woke up in the early hours with a dreadful cough and feeling generally grim. I phoned in sick at work and fortuitously had already booked a GP appointment for the next day for a meds review. By the time I saw my GP I was struggling to breathe, coughing was agony and I felt like death warmed up. He declared that I had an "impressive" temperature at 39.4 and prescribed antibiotics and steroid tablets. I've spent the rest of the week slowly recovering but still feel terrible, but at least I made my DT card to share today. Still got to make Mum's 80th birthday card as it was her birthday in Tuesday, but we're having a family meal on Sunday (assuming we're all well enough!). I daren't mention it, but I think my dodgy tooth is playing up again as I have a tender swelling in my neck under it - just hoping it's a lymph node from the chest infection, but not really convinced!
If you're still here, I'm very impressed and sorry for having such a long whinge! I hope you are all keeping safe, happy and well. I would say wealthy too, but let's be honest we've probably spent all our dosh on new craft stash! Have a great weekend, I hope to visit you soon x


Wednesday 7 March 2018

No Crafting, Just Bunnies!

Willow has a new friend! We decided to change his name from Oscar to Herb, so we have Willowherb (wildflower buffs will get the reference)!
They got on well at the rescue and were able to come home on Saturday and we've gradually increased the space that they have. Herb will eat from my hand as long as Willow does first, and I've even managed to get a couple of nose rubs in without being boxed or growled at. He's got some amazing moult lines on his coat, which is incredibly thick and silky.


They seem to be enjoying each other's company, but I can't tell if they spent their time sat together as whenever I try to sneak a peek, Willow jumps up and runs to the door to investigate what's going on! They look ridiculously fat in the last photo but it's all fluffed up fur, honest! Wish I had that excuse! 
I shall try and get some crafting finished, I have lots of half finished cards and bits but am lacking the motivation to finish them. Must get my act together though as it's Mothers Day on Sunday and Mum's 80th birthday next week and I haven't even started those cards yet, oops. Hope you're all having a good week x